Recording Tips
Mojave microphones excel at reproducing acoustic instruments, such as acoustic guitar. While positioning the microphone in front of the sound hole may look like the obvious place, the sound can be overly boomy and lacking in the upper harmonic content that the top of the guitar generates. A great place to start is pointing the mic at the junction of the body and the neck or at the twelfth fret. Another popular spot is pointing at the bridge or slightly behind. If you are doing a track that would benefit from the spread of the guitar in stereo, using both of these positions can yield a really big sound.
Sound is energy that travels in waves – sound waves. These sound waves have a frequency and a wavelength, both of which relate to pitch, to put it in musical terms. The higher the frequency (pitch), the shorter the wavelength: the lower the frequency (pitch) the longer the wavelength.
Sound waves can be reflected, which can be a good thing (echo, reverb, ambiance) or a bad thing (standing waves). Echo is when a reflection is delayed long enough to be perceived as a distinct repeat of the original sound. Reverberation is when there are many overlapping repeats of the original sound that last after the original sound has stopped.
One of the advantages of a professionally designed recording studio is the pleasing sound of the space and the lack of acoustic problems. The most common problems in semi-pro and home studios are a) keeping the sound from escaping and disturbing others (transmission) and b) the sound inside the room. In a nutshell, the way to deal with transmission is a combination of mass and airspace (isolation) in the walls, ceiling and floor. Dealing with the sound of the room is done with a combination of geometry, absorption and diffusion.
One of the basic problems to be dealt with is that of parallel surfaces – they can create an unwanted effect called ‘standing waves’ – basically the sound ping-ponging back and forth. Standing waves occur at certain frequencies related to the distance between the surfaces. The original sound and the reflected sound will combine to boost certain frequencies and to cancel others – creating a comb filter effect. The best way to deal with this is to design the room with no parallel surfaces and with enough volume (room size) to minimize standing waves. Unfortunately, this isn’t always possible, so other remedies must be considered, which leads us to absorption and diffusion. Frequencies above 500Hz are very short and are easily soaked up by using foam or rock wool type products. The sound waves bounce around inside the absorptive material and turn into heat. Frequencies below 500Hz are tougher, due to their length, and require ‘bass traps’ big enough to capture the wave and let it turn into heat. Diffusers work by reflecting the sound back into the room, but spread out, usually over a 180 degree arc.
A room with too much absorption will sound overly dead; too little will make it sound overly live. It is preferable to have a mix of absorption and diffusion to create a good sounding room. There are many great resources available to help with acoustic design. Enter “basic acoustics” into a web browser and you will find many great websites, especially those of manufacturers of absorbers, diffusers and bass traps, ready made for studio use.
Compressors and limiters are devices used to control the dynamic range of an audio signal. Compression can be used subtly and transparently or as effect, where the signal sounds completely “crushed”. Most of today’s modern rock and pop recordings use a lot of compression, both on individual instruments and the final mix. More compression is usually applied in the mastering process, often to make the mix sound loud and “in your face”. In classical and traditional jazz recording, compression is used much more subtly, if at all.
Compressors work by reducing the gain of an incoming signal by a user specified compression ratio. The processing is caused when the level of the signal exceeds a user specified threshold. Common ratios range from 2:1 to 16:1. Higher ratios of 20:1 or more are known as limiting because the gain reduction begins to take effect more suddenly after the threshold is exceeded. This can be useful for protecting amplifiers, speakers, and radio signal modulators from overloading. Most engineers favor recording with a small amount of compression in order to get more signal to the recording device
Any time two or more mics are used on a single source, phase becomes an issue. Phasing problems occur when a sound reaches different mics at different times. The more mics you have open, the greater the chance for there to be phasing issues. Excluding stereo miking techniques for the moment, the basic rule is mics should be placed three times further from each other than from the source. If you are miking separate instruments, try to isolate the instruments from each other as much as possible. If you are using multiple mics on one source – a speaker cabinet, for instance, take the time to get the mics ‘phase aligned’. This can be done first visually, making sure the capsules are lined up relative to the speaker, and, secondly, with a pair of headphones on. Often times a slight variation in the placement of one of the mics, relative to the other, will produce an audible improvement – or degradation – in the combined sound. This is especially noticeable in the bass frequencies. Two mics in phase will get louder and fatter when combined. Two out-of-phase mics will get hollow sounding and thin when combined.
Also of importance is the electrical phase of two or more mics. If a cable is miswired somewhere in the signal path, it will put one of the mics out of phase. A great tool to have around the studio is a cable tester which shows not only continuity, but polarity. Take a few hours and make sure all your cables are properly wired. This will save time in trouble-shooting down the road during your sessions.
Mojave microphones make an excellent choice for drum micing.
Here are some recommended applications:
Overheads: All models. For loud sources, use either the MA-201fets, MA-101fets or MA-300s. The mics may be placed on a stereo bar over the center of the kit or on separate stands over the cymbals.
Room micing: Some engineers like to place the mics about waist high in front of the kick drum, capturing an accurate stereo image of the kit: others like to place the mics higher up on stands, fairly distant from the drum kit, capturing more of the room ambiance. Both are valid approaches that can also work together. Try compressing the pair for added excitement.
Kick drum: The MA-201fet is an excellent choice for placing outside the kick and combining with a dynamic mic placed inside near the beater.
Snare Drum: The MA-101fet, with it’s internal -15dB pad, is specifically designed to handle the high SPL level of a snare drum.
Hi Hat: MA101fet or MA-100. For very loud sources, use the MA-101fet with the pad engaged.
Toms: MA-201fet, MA-100, MA-101fet. For very loud sources, use the MA-101fet with the pad engaged.
A great way to mic percussion instruments, such as tambourine and shakers, is to place the mic directly overhead facing straight down. This method smoothes out the dynamic fluctuations that are inherent in these instruments. For congas, timbales, mallet instruments (vibes, marimbas, xylophones) and percussion kits, a pair of Mojaves on a stereo bar or spread wider on separate stands will yield excellent results.
All of the Mojave models sound great on guitar amps, but, for really loud applications, we recommend the MA-101fet (small diaphragm) or the MA-300 (large diaphragm). With the -15dB pad engaged, even the loudest of signals will be delivered to the mic pre without distortion.
The signal produced by a microphone is a relatively low level signal and needs to be amplified to ‘line level’ in order to be processed, routed and recorded. Next to the microphone itself, the choice of preamps is critical in achieving a great sound. As with microphones, there is no perfect preamp.
While every recording console has built in mic pres, many engineers favor the quality produced by outboard mic pres. Some popular mic pres, such as Neve, API, Trident, Chandler, actually originated in classic recording consoles. Many of the newer brands are based around vintage designs, with varying degrees of success. There are also several fine tube designs and a number of remarkable modern designs.
As a mic manufacturer, we’ve had the opportunity to work with many brands of preamplifiers. Here are a few we’ve had good results with, in no particular order:
- Millennia Media
- Grace
- Great River
- BAE
- Hardy
- Neve
- API
- Universal Audio
- Chandler
- Daking
- Burl
- Manley
- A Designs
Microphone placement is part art, part science. This is where the engineer really gets to shine. While there are no rules, there are lots of generalities to reference. Basically it breaks down to choices: microphone choice, single or multiple mics, and close or distant placement. Often, the sound of the room will determine how much of it the engineer decides to capture, for instance, a bedroom vs. a large, well designed studio. When acoustic problems are present, close miking is generally called for, although occasionally a quirky room sound is just the thing for a specific track. In a nice sounding room, the engineer has the option of using more of the ambiance, especially on instruments like drums, strings and electric guitars. The great engineers are known as much for their skill in mic placement as for their other talents. Unhappy with the sound? Move the mic before you reach for the EQ. Still unhappy? Try a different mic.
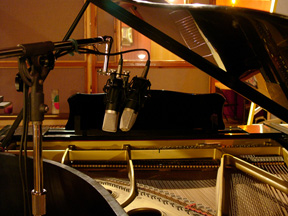
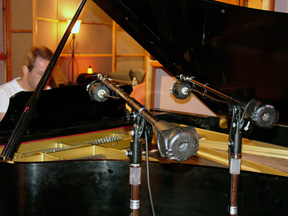
There are several time-tested techniques for recording acoustic piano. Making the right choice is highly dependent upon the type of music and the desired sound. Generally, rock, country and pop are recorded tighter and brighter than one would record jazz or classical. The brightest, tightest sound will be achieved by placing a pair of mics directly over the hammers, either in an X-Y pattern (see Stereo Miking above) or spread out about halfway between middle C and the outer edges. A mellower variation would be placing the mics just inside the lid, one for the high notes and one for the low notes. Engineers recording classical music often place the mics several feet (or more) outside the piano. This technique, of course, requires a good sounding room.
Audio Sample – MA-200s on Stereo Bar
Audio Sample – MA-200s Stereo Pair
Stereo Miking is the use of a matched pair of microphones to capture a single source in a stereo field. The source could be anything from a single instrument to a symphony orchestra. The beauty of a well executed stereo recording is that it preserves the left-right panorama, the balance between the instruments, and the depth of field. While stereo miking has grown out of classical work, it can be very useful for any style of recording.
- Drum overheads
- Acoustic piano
- Percussion
- Backing vocals
- Horn sections
- String ensembles
- Choral groups
- Ambiance
- Location recording for film or TV
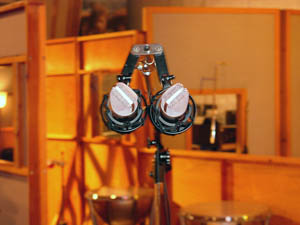
Stereo miking techniques fall generally into two categories: coincident (one mic right next to the other) or spaced. Coincident pairs are generally more accurate but subtle, spaced pairs tend to be more dramatic. Engineers often record a combination and adjust the balance in the mix.
The simplest coincident technique is the X-Y, which is accomplished by placing the mics at a 90 degree angle to each other, with one capsule stacked on top of the other.This gives a very realistic stereo image and is mono-compatible, meaning that the two signals will combine without any phase problems (see 5. Phase Issues above). Several well-known stereo mics are built in this fashion, among them the AKG C-24 and the Royer SF-12 and SF-24. Other coincident techniques include Blumlein, ORTF, and M-S (mid-side). While Blumlein and ORTF have their uses, M-S is very popular among engineers. M-S is done with a mic facing the middle of the source, with a bidirectional mic aiming to the sides. This produces left- and right-channel signals. With this technique, the stereo spread can be remote-controlled by varying the ratio of the mid signal to the side signal. The discreet signals can be recorded separately and balanced in the mix, giving the engineer control over the apparent placement of the mic. This remote control is also useful at live concerts, where you can’t physically adjust the microphones during the concert. MS localization accuracy (the realism of the stereo image) is excellent.
Spaced stereo miking can be done with a pair of omni or cardiod mics placed at a distance of roughly 1/2 to1/3 the width of the sound field. While not as accurate as coincident pairs, spaced pairs give a dramatic stereo spread which can be very useful. Engineers often record drum room ambiance this way, to be mixed in with the close mics, giving the kit its size. Spaced omnis are often used for recording orchestras, either alone or mixed with a coincident pair to add width. A variation on the spaced pair is the Decca Tree, which adds a center mic to a pair spaced approximately 80″ apart on a large T-shaped bar. This method is very popular in film and TV scoring, thanks to the post-recording control of the center channel.
For those interested in learning more about stereo miking techniques, volumes have been written and are readily available in books and on the Internet.
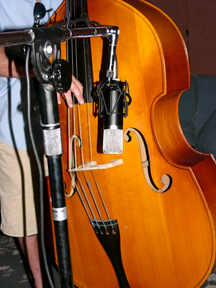
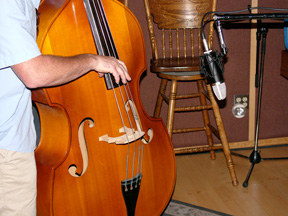
When miking an upright bass, the goal is to get a good balance between the full tone of the body (lower frequencies) and the attack generated by the fingers on the strings (higher frequencies). A great place to start is with the mic about 15″ from the body, at a height between the bridge and the bottom of the neck. Aim the mic at a point between the strings and the sound hole, addressing the instrument at a slight angle. Adjust to taste.
For added ‘snap’ (attack) add an MA-100 or MA-101fet pointed at the fingerboard.
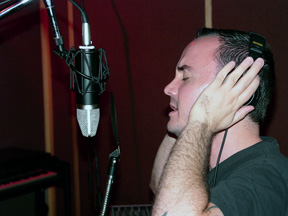
Mojave microphones are an excellent choice for a vocal miking and will help to reduce or eliminate several common problems before they occur. Recording vocals can be tricky in that a slight variation in placement can yield a large effect. Generally, a good starting place is about 12″ from the microphone with the mic capsule either level with or slightly above the singer’s mouth (see photo).
A pop filter is a must when recording vocals. Placing the mic slightly above the singer’s mouth, pointing down at a slight angle, can help control plosives and yield a slightly more open sound on some singers. Due to proximity effect (see ‘What is proximity effect?’ in the FAQ section), decreasing the distance between singer and mic can greatly increase the bottom end, which may or may not be desirable. Getting too close to the mic can create unwanted artifacts, such as lip smacks and other mouth noises that are difficult to deal with after the fact and should be avoided. Choices of processing gear, such as mic preamps, compressors and converters all play a role in recording a great vocal sound (see ‘Mic Preamps’ and ‘Compressors and Limiters’ above). Care should be taken in setting the preamp gain on loud passages to avoid overloading the input stage of the pre. Compression can help smooth out the dynamic range of the performance and allow a hotter level to ‘tape’, whatever your recording medium might be. For a place to start, try a 4:1 ratio, compressing -3 to -5db on the peaks.
When miking reed instruments in the studio, it is important to remember that there is more sound coming off the instrument than just what comes out of the bell. Try placing the mic vertically, parallel to the keys, about mid-instrument. This captures harmonic content that comes off the keys, resulting in a more balanced sound.